- Accounts
-
Shop
- Bundle / School Shop
- Personal Shop
-
SoundcheckPro
- Getting Started
- Session Mode
- Console Operation
- Audio Effects
- Education
- Advanced Functions
- Troubleshoot
- Xena Mixer
- Yamuka Mixer
- Maggie Mixer
- Zedd Mixer
- DG32 Digital Mixer
- SteeV88
- Audyssey Console
- Xena Web App
- EDU Portal
-
VirtualStudioXR
- Collab-Mode
- Getting Started
- Session Mode
-
WAX
- Getting Started
- Developer
Session Overview
- Docs
- SoundcheckPro
- Session Mode
- Session Overview
Introduction
SoundcheckPro sessions are designed to put the user in the seat of the head engineer. All of the important components for an engineer to manage a session are present and “within arms reach”.
SoundcheckPro is not a typical “DAW” nor should it be treated as such. Mixing audio in SoundcheckPro is not reliant on menus or right clicks or undo buttons. Rather it spotlights the workflow and obstacles for all it contributes to the mystical powers of the engineer in the analog domain.
The goal of a DAW is to record the highest quality sounds, and processing the sounds at fastest possible time. The goal of SoundcheckPro (or analog) is to rely on a physical environment for a more hands-on process. Read more about “How SoundcheckPro Differs from the Traditional DAW”
The main window is divided into 3 components:
- Console
- External Rack
- Transport Bar & Focus Bar
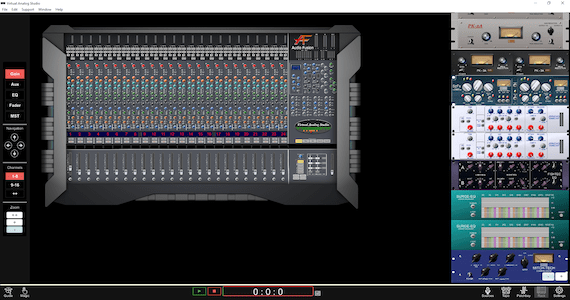
Console Window
For navigating the console, use the mouse and scroll.
The focus bar (described below) has some controls to navigate and zoom.
External Rack Window
All units external to the console reside in this window.
There are an array of audio processors, tape-machine and the patchbay.
Transport Bar
Playback functions, sources , guides & settings.
Guide
Display or hide the session tutorials

Magic Button
Click and zoom in on any section of the session environment.
Keyboard Shortcut:
Mac: Apple+Left Click
Windows: Control+Click
Focus Bar
Quick console navigation controller.
Console Sections
Jump to the desired section of the console
(Input Gain, Aux, EQ, Fader & MST)
Navigation
Scroll the channels individually using the arrows or keyboard.
Channels #
Scroll to groups of channels.
Console Zoom %
How close or far the camera is from the console.